Real-time Hair Creation Workflow
When aiming for realistic-looking hair for games, there are two options: polygonal hair created of hair strips (cards) and strand-based hair (since UnrealEngine presented the new hair system - UE4 Real-time Hair Advances – fxguide. Even with the new tech advances, strand-based hair still is very taxing on the real-time rendering, so most of the game developers, both of AAA and indie scale, choose the hair cards workflow, and usually keep the hair model in a range of 4k to 20k triangles.
Real-time hair - cards VS strands
capture from Robin Taillandier & Jon Valdes - Every Strand Counts: Physics and Rendering Behind Frostbite’s Hair
Though there are a gazillion ways to make hair look good in the game, a few common workflows are currently used for real-time hair production. They vary depending on the desired rendering quality, polygon budget and the restrictions/options of the shader in the game engine of choice.
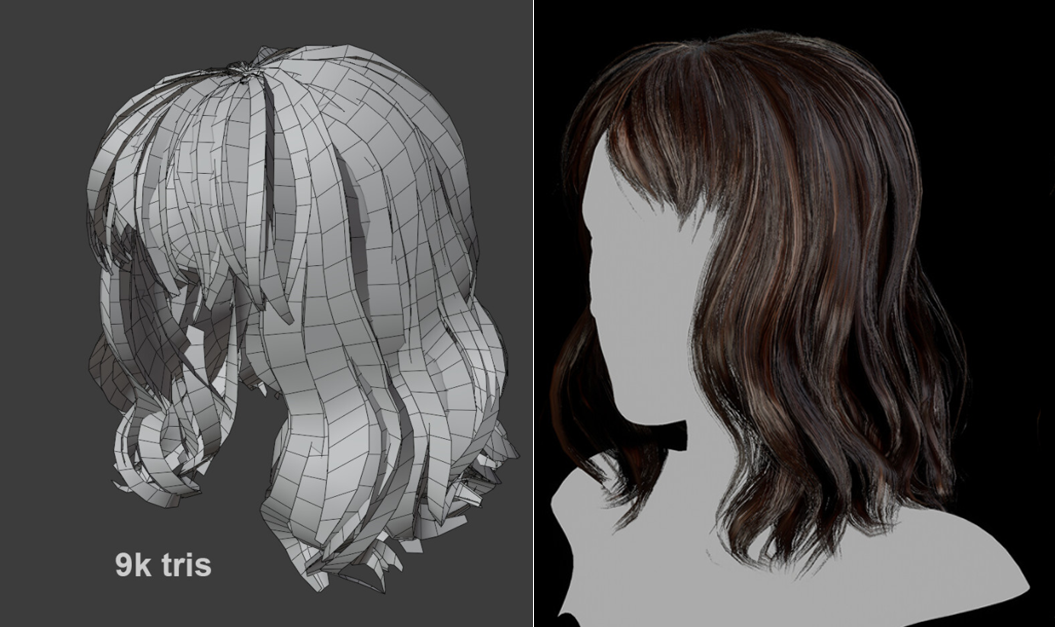
Hair for games is made by creating hair strips (so-called hair cards) to represent the hair strands and applying the alpha texture on them. Placing hair cards layer by layer simulates the mass of the hair. The higher amount of hair cards gives the hair a more realistic look but makes the hair model expensive. Thus artists try to achieve the best result by spending less card amount.
Example of the Hair model made of Hair Cards and Final Render in UnrealEngine4
Example of the Hair model made of Hair Cards and Final Render in UnrealEngine4
Generally, the game hair production process includes these steps:
Creating hair textures
Placing hair cards
Rendering hair (shader setup)
Which software to use for creating game-ready hair?
Actually, you can use any 3D modeling software. Maya, 3dMax, Blender and Zbrush, each offer great tools to back you up with the texture creation and laying hair cards. The workflows differ, as you will read further in this post, but the basic concept is the same.
I would suggest using the 3D program you already familiar with. If you have more than one under your belt, take a look at the numerous tools and plugins out there for creating hair. For example, being a Maya user I learned Blender just to able to use this awesome Hair tool, which sped up my hair card placement process in times.
My workflow of creating hair for games
1. References and Planning
Placing hair cards is quite a time consuming and tedious, so it is crucial to plan the process ahead to save time.
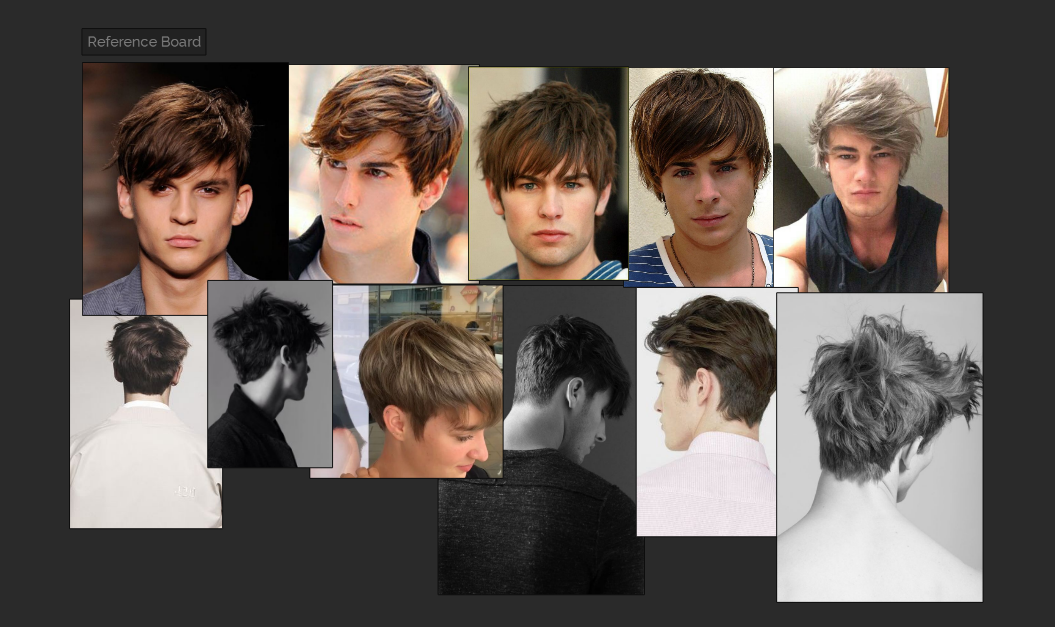
Planning involves a profound understanding of the structure of the haircut you making. Gather references with the front, back, side, and top views of the hairstyle and answer these questions:
How does the hair flow? In what direction?
What is the shape of hair parting?
Curly or straight? What is the level of dispersion? Are there a lot of messy strands? Is it thick or thin?
Understanding every aspect of the hairstyle that you are creating allows you to choose the most effective workflow, save time, and achieve the best results.
Reference Board made with
2. Sculpted hair for reference
To answer these questions, I started with the sculpted mesh in ZBrush. I would further use it as a 3d reference in Maya to place cards.
The sculpted hair doesn't need to be detailed, I kept it simple and low poly, I've spent 20 mins on it max. The main goal is to design the hairstyle shape (the silhouette), establish the hair strands' flow, and estimate the width of the hair cards.
Sculpted hair for reference
Sculpted hair for reference
3. Create the hair texture
Check out my post about8 Ways to create the textures for real-time hair.
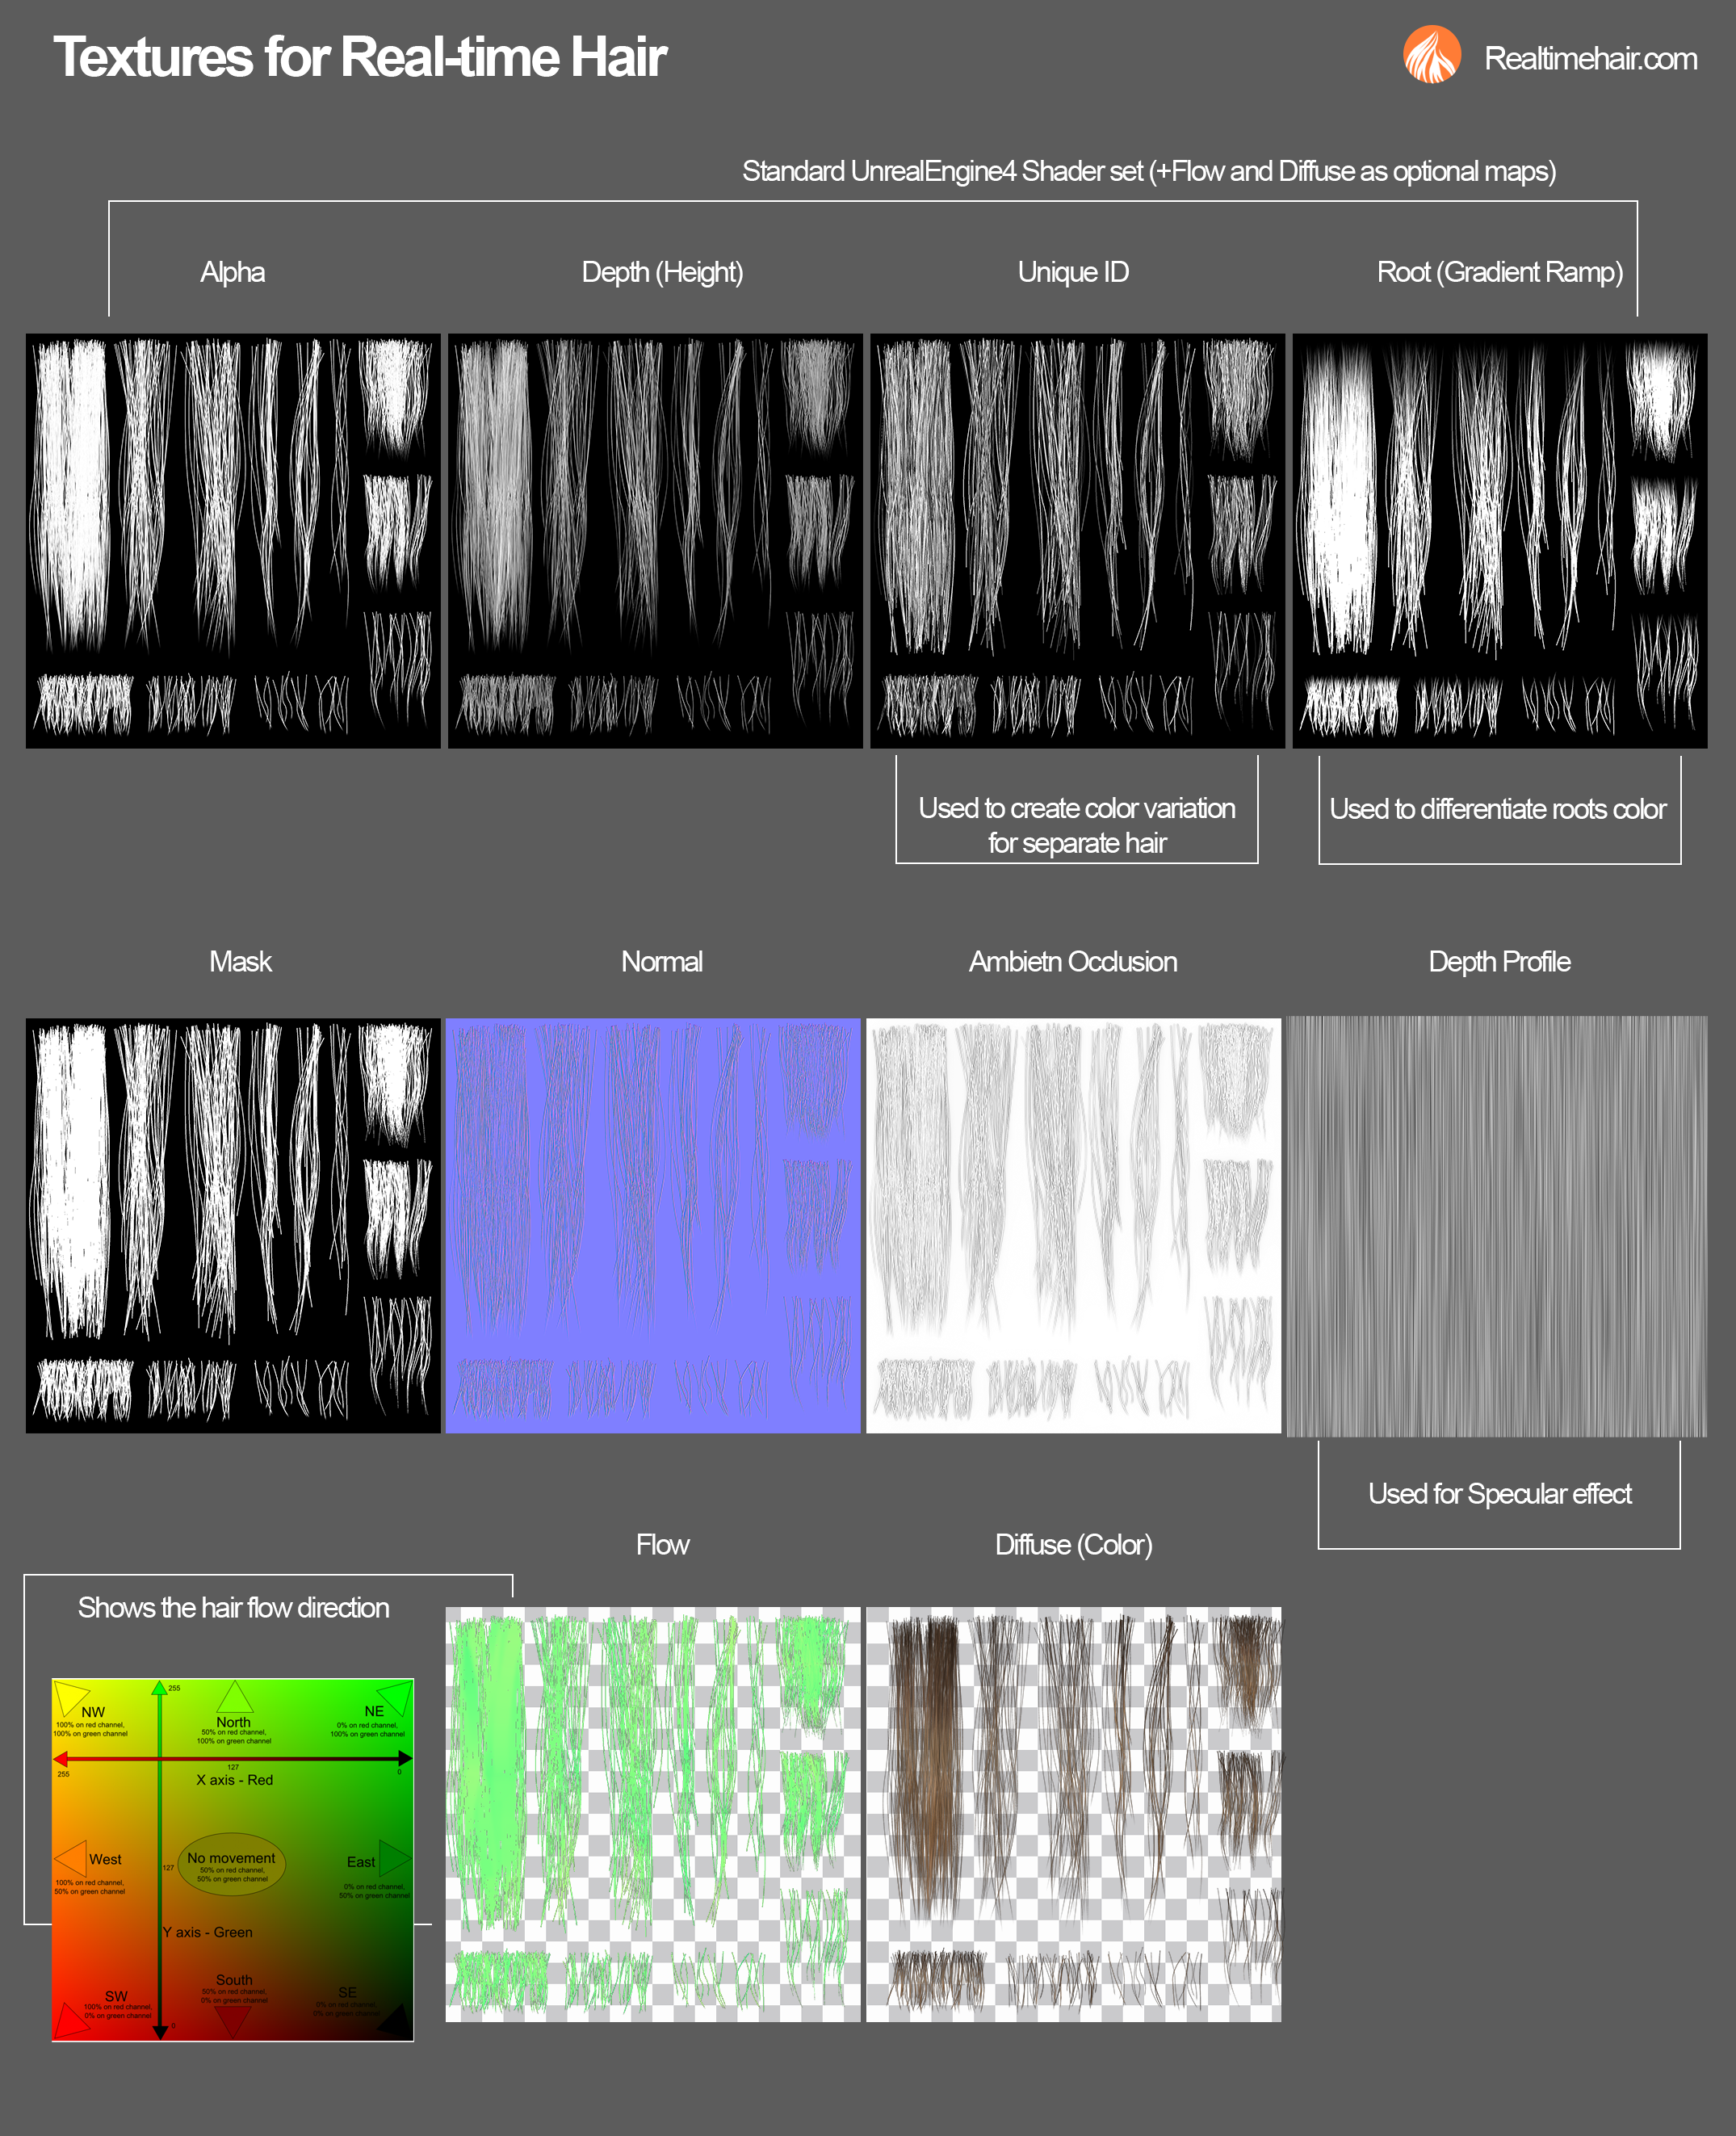
Reference images helped me understand what kind of hair strands fit this hairstyle best. Different game engines use different shaders (material properties) for real-time hair. Check with the technical artist/game programmer which texture maps are required. For example, UnrealEngine 4 uses these maps:
Alpha, Depth (or Height), Unique ID and Root (or Gradient Ramp). Diffuse (color) and Flow maps are optional.
Other shaders can require: Mask, Normal, Ambient Occlusion and sometimes, Depth Profile (when there's no baked Height Map).
Textures for real-time hair
There are different ways to create the hair texture, the most common is to bake the generated xGen hair (in Maya), Hair Particles (in Blender), or FiberMesh Hair (in Zbrush), using the native application, Marmoset or xNormals. There are also a few tools that offer procedural generation of Hair Texture.
I created my textures using HairTG Hair&Fur tool for Substance Designer.
Check out my post about 8 Ways to create the textures for real-time hair.
When creating the hair texture, I followed these principles:
Create hair strands variation – to avoid evident repetition in texture across the hair model.
Create clumps with different hair amount - density. I tend to use cards with a more dense texture as the base layer and place them closer to the hair scalp. On the top layer, I use the cards with lower density and some distinctive hair variations (like waves or gaps between strands). Here's a great breakdown of which strands to use on which layers by Jansen Turk https://www.artstation.com/artwork/YaD6oP
Keep each strand the same width – or have few types of width. Make hair cards that are closer to the scalp wider, and others thinner – but the same width for each group (layer). This will help easily switch UV space for hair cards (to use texture variation where it is necessary) and keep the rendered hair thickness the same for all cards.
Some hairstyles, mostly short male hair require the creation of hair cap mesh and texture. Check out my video of how to create one.
5. Place the hair cards.
Check out my post about the 13 workflows to place hair cards for real-time hair.
The lower your polygon budget, the more precise you should be about placing hair cards. I found that manual hair card placement works best for me when trying to get the mesh done under 10k tris.
For meshes under 4k tris, I use the Quad Draw tool (in Maya) to create the Base (Cover) layer of cards over live sculpted mesh (sculpted in ZBrush). Then I manually put the other layers of cards. I also like to use Blender Hair Tool to lay down base layers - it's super fast. I just convert the grid mesh (which has a form of a head) and the tool generated the hair cards cover layer. Check out this video.
Hair Cards Layering
Hair Cards Layering
Before placing cards, I considered the following:
When you work with low poly hair (under 6-8k) the best result give the manual placing of hair cards. For higher tricount, you can play with different tools and automated workflows, like generating hair curves with xGen in Maya and then converting them into ribbon meshes (hair cards).
Consider how close the player will see the character's hair, from what angle (is it a top-down view, or a third person) To achieve the best result, make the hair look good from this particular angle/zoom.
Setup the shader/hair material in the real-time engine and frequently check how the hair mesh. I usually place the first layer of cards and check the mesh in the engine. It allows me to spot the mistakes/see-throughs/gaps/texture repetitions and fix them before the card structure becomes complex.
If you are using a cap mesh, it is good to plan a transition between cap texture and cards using cards with low-density hair.
Thank you for reading!


